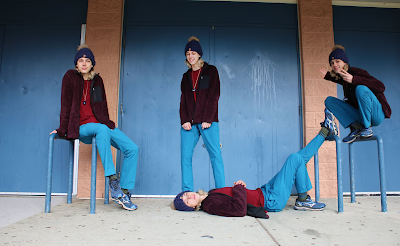
Multiplicity Shot : 20 Marks
Step by Step Instructions for Doing the Shot ( 4 shots in one)
You should be going out with a partner, a digital slr camera and a tripod. Find a location that has a clean and interesting background. Start by taking some practice shots to make sure you are not too far away from your subject. Have your subject think about doing 4 different poses. Each pose will be a different shot. ALL OF THESE PHOTOS SHOULD BE SHOT ON THE SAME DAY. Come back to the class, and using the card reader upload the photos and save them in your folder and label Multiplicity.
1. If you need to crop or edit for lighting, do this first to all photos.
2. Photos should be labelled: Background, Photo1,2,3,4.
3. Open Original photo in Photoshop. This is the photo you will be adding the other photos to.
4. Next open Photo 1 in a new tab, use the selection tool ( the fourth tool down on the left) to select around the photo, it does not have to be perfect since you can erase if you have to.
5. Next go to edit/cut and cut out the image you have just selected.
6. Open your original photo and edit/paste it in the the original photo( photo 1). It will not be exactly where you want it...so go to edit/transform/scale, hit apply or the return button. Then using the move tool ( top on left) move the photo where you want it. If scaling it up or down, make sure to hold the shift key when scaling so you resize proportionately. ( I will be marking to make sure your photos are not warped)
7. Continue the same for photo 2 and 3
8. When finished, save a Photoshop version and a jpeg version.

